Vill passa på att inspirera er med fem fina höstnagellack från mitt favoritmärke OPI eftersom jag i oktober har en rabattkod på Parfym.se!
Koden "Helenaokt” ger...
Sweed Lashes Mascara är otroligt omskrivna i sociala medier och här kommer min recension av båda varianterna; Sweed Lashes Cloud Mascara och Sweed Lashes...
Finally, I thought I would show you our self-built campervan / sheet metal / motorhome! Also takes the opportunity to answer what to think about when ...
Finally, I thought I would show you our self-built campervan / sheet metal / motorhome! Also takes the opportunity to answer what to think about when ...
I have been using Manukahonung MGO 600+ for a while to relieve my sore throat and try to get rid of my recurring sore throat / throat infections. So...
Today's make-up is a perfect way to wear blue eye shadow - make a brown sweep around and frame the eyes with a sharp eyeliner, then it is much easier to feel comfortable! I kind of forgot that I was so colorful :)
My sister Malin loves (as you who have watched our video podcast already know) IsaDora's gel polish! I have not actually put these to the test properly before even though I was hungry, but have now finally done so and really agree with Malin!
The result is very nice, they dry quickly despite several layers and are incredibly durable. Really thumbs up!
There are specific gel nail polishes and a top coat to be used for just these and in IsaDora's latest press release I also got the gel top coat IsaDora Gel Matt Top Coat which makes the nails matte.
This topcoat also gets two thumbs up! I apply two coats of gel-nail polish and then this over, and despite three coats, it dries relatively quickly without being soft for a long time, which is otherwise common in several applications. And the result is matte, even and nice.
What I like about the fact that this top coat is just a gel polish is because the result is so even on the nail even if they are not polished, otherwise matte nail polish can easily emphasize the irregularities more than a glossy one, I think.
On the middle finger I have the glossy topcoat so that you can see the difference better.
As you can see in the pictures in this post, my nails are not 100% smooth either but you should know what they look like underneath, I really have not taken care of my hands lately (fy ashamed) and they are so worn that it barely can be polished off because then they would be so thin .. So this even result on my nails is really great!
The shade I have in the pictures is 266 Purple Power, it looks a little more purple in the bottle but I think it goes more in the burgundy direction on the nails for some reason, but still very nice!
Can you use the matte top coat over other nail polishes as well?
Answer yes! :) It also works for nail polish that is not gel polish and gets the second mark, which makes me very happy.
The matte top coat IsaDora Gel Matt Top Coat costs SEK 89, just like the other gel varnishes from IsaDora.
Here is a post about making the eyes bigger while the look is natural and everyday. Because most often when you do make-up that enlarges a lot, you like to use darker colors for more contrast to the light and the result is often more make-up than what many people want in everyday life.
If you like the look, can I make a movie on how to do it too? It's pretty simple! :)
Here you see before and after eye makeup. Surely there is a difference? :)
Covering base
Jag har täckt ordentligt med foundation och concealer även kring ögonen, vilket är viktigt för att trolla bort alla naturliga skuggor och göra ögonen mer “platta”. Det gör jag för att sedan kunna skapa mina egna skuggor där jag vill ha dom för att dra ut blicken lite mer.
Lighten up
Jag har ljusat upp med både en ljus ögonskugga och med en beige/benvit kajalpenna. Ljus öppnar upp ögat och ger en “poppande effekt” där man applicerar en nyans som är ljusare än hudtonen.
Darken down
A shade that is darker than the skin tone creates depth, and highlights what we have brightened, which also enhances the enlarging effect.
Pull out and open your eyes
Darken down with dark shadow a little further up, a little further out and a little further down than you do if you follow the eye's own shape.
I have also put mascara in just the tops of the lower lashes, which also creates the illusion that the eyes are more open. I made the lower lashes light with eyeliner in the roots of the lashes, you can use a white mascara as well, but for a natural look, I prefer a beige tone more. Beige / off-white becomes more discreet as chalk white stands out more and is easy to look greyish if you do not get a nice chalk white shade.
Beige kajalpenna längs vattenlinjen och i underfransarnas “hårbotten”, gloMinerals Eye Pencil (Peach)
Brown eyeshadow (same as before, it looks darker just because I apply more with a compact brush) in the outer corner of the eye and outwards as a weak wing to lift the gaze.
A few months ago I received a press release from IsaDora with all their lipsticks and lipsticks in the new series Sculpt Your Lips. Feels like I'm the last in the beauty world to review these haha! Any of you who have already bought them and tested them yourself? :)
This lip collection is based on the contouring trend and to do contouring (sculpting) on the lips as well and not just the face. With a lip pencil in the same shade, a little, a little darker for a perfect contour and then a glossy, creamy lipstick on the rest of the lips that is a little lighter, the lips look fuller - and still super sharp. You can also paint outside your natural contour for an even more enlarging effect. I myself paint a lot outside :)
Here you see my lips with the shade Marsala - my favorite!
I have not put every single shade to the test for 100%, but have tested some and here is my review based on that:
sustainability
I think the durability of the lip pen is awesome! The durability of the lipsticks is also great, but creamy lipsticks generally do not hold up as well as carpet when eating and drinking, and the same is true with these. But thanks to a cruel lip pencil, it is super easy to improve as you never have to improve on the sole out of the contours. And it is basically only after eating that it needs to be improved in the middle of the lips, otherwise it sits like a slam!
Feeling & formula
Very creamy and smooth, not sticky, sticky or uncomfortable but feels really soft and comfortable. I have only tested the pen on the whole lips as well, completely without lipstick, but they are a bit too heavy for that, the lips get a bit sticky dry type, so it is more of a contour pencil (which is the point). I would possibly like a little, a little more creamy feeling in the lip pens when applying, but it's small details and a matter of taste :)
Packaging
One of my pens came off immediately, and I experience that the corks do not fit very well and have come loose in the make-up box sometimes when I stuff around and look for other make-up. Is not so gentle either per se but never has that problem with other makeup. In addition to that, I like the design of the products, good shape of the lipstick and the tip of the pencils is easy to paint with!
Results
Super nice, super nice, super nice! The darkest shades are a little harder to get perfect coverage on, as it is almost always with very dark tones, I think, but they are really nice too, it only takes a little more application than the light ones.
Summary
Both the lipsticks and the lipsticks get two thumbs up from me, the lipsticks are not something I would use without lipsticks but the lipsticks are great on their own as well. And affordable too!
Here you see all the shades quickly painted on my arm, the lipstick on the left and the lip pen on the right on each shade. The pen is slightly darker and more matte than the lipstick for a perfect contour that enlarges the lips and works well even for painting outside its actual shape.
I love marsala colors for everything! Lipstick, eye shadow, clothes, shoes, you name it, and hence the shade Marsala is the absolute favorite of these lipsticks!
Which do you think is the most beautiful?
1. I start with the lip pencil and fill in the contours outside my own shape.
2. Put on the lipstick and apply a little on top of the lip pencil too, then ready!
Molkan has made a super nice swatch on the lips with all the shades if you want to see them even more clearly, have a look at her post here!
Now we have finally started with apprenticeships for permanent makeup at the salon! Our apprenticeships mean the same high quality and results, but at a much lower price :) Perfect for you who want to do permanent makeup but do not want to spend as much money as Annika and Amir costs - without having to risk a worse result at another salon .
Our apprentice Ida, who has worked with us since April, is both a makeup artist and trained in medical pigmentation of warts. She has worked with this at the hospital for several years before she started with us, which makes her the perfect candidate to start as an apprentice with Annika. She knows makeup AND has experience of tattooing - better basic conditions can not be found!
Lärlingsbehandlingarna tar något längre tid, och det kan komma att behövas ett extra återbesök med ifyllnad för att slutresultatet ska bli perfekt. Det beror på att man som nybörjare ofta är lite försiktig. Man vågar inte “ta i” tillräckligt, och man har inte lärt sig hur mycket färg som försvinner under läkningen. Permanent make up ska se för mycket ut när den är nygjord! Om det ser lagom ut direkt efter så kommer det att bli för svagt när det har läkt, och det tar en stund att lära sig det.
Behandlingarna som Ida gör i dagsläget är “Lashliner uppe och/eller nere” och “Läppar intonad kontur”. Dessa har hon övat på och känner sig säker med och kommer regelbundet öppna upp för nya behandlingsområden i takt med att hon får mer erfarenhet. Man kan inte börja med allt på en gång :)
“Coming soon-behandlingar” som Ida snart erbjuder är inliner (ljus vattenlinje), highlights och bredare eyeliner.
We have different levels of apprenticeships: Level 1: Annika is present throughout the treatment. (50% discount on regular price.) (Ida is currently at this level) Level 2: Annika is at the beginning and end of each treatment. (40% discount on regular price.) Level 3: Annika is present at the end of each new treatment and at the beginning of the return visit. (30% discount on regular price.) Level 4: Annika is at the beginning of the return visit. (20% discount on regular price.) Level 5: Self-propelled.
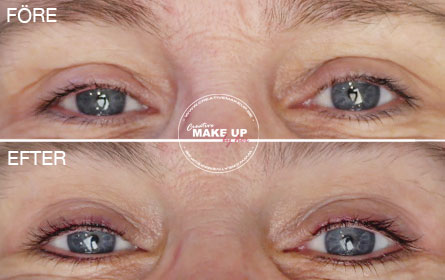
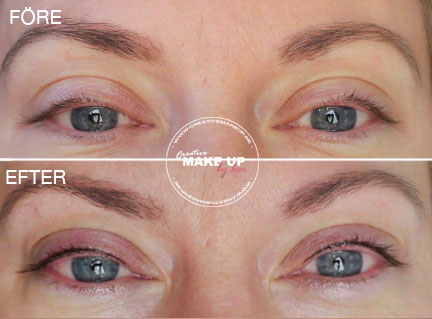
Here are examples of two lashlines that Ida has tattooed:
Nice huh? :) If someone had asked, I would not have been able to see if it was Annika, Amir or Ida who made these!
It is only possible to book apprenticeships by phone or email at present, but you can call us on 018 10 50 13 to book an appointment or email info@creativemakeup.se.



 English
  Swedish
  Spanish