

Det finns jättemycket enkla sminktips för nybörjare som får din sminkning att se välgjord och fin ut – utan att det är särskilt svårt rent tekniskt. En mening jag upprepar jag vet inte hur många gånger till mina kunder är “smink must not be so difficult ”:)
It does not have to be at all complicated to put on make-up yourself, at least not after you have seen this make-up step by step for beginners;) You can make it very difficult for yourself, but it can also be easy!
In today's post, I therefore thought I would share 12 simple makeup tips for beginners that are quick to make and easy, provided you have good products and tools.
Make-up & Make-up tips for beginners
The post is divided into these 12 simple makeup tips for beginners:
- Mineral Foundation
- Rouge in neutral tone
- Simple eyebrow pencil
- Do not skip eye primer
- The same eye shadow around the whole eye
- Brighten up around the eyes
- Light eyeliner along the waterline
- Lighten up around the lips
- Black eye shadow instead of eyeliner
- A good mascara that does not smudge or crumble
- Colored lip balm
- The importance of good products
Mineral Foundation:
Innan jag går in på alla sminktips så vill jag först slå ett slag för bra sminkborstar! Med “bra” så menar jag inte bara hög kvalité, utan även att de passar för användningsområdet.
One of the most common mistakes is that e.g. use an oversized makeup brush for the eyelid or one that is too fluffy when toning out the eye shadow. Which makes everything much harder!
I therefore want to start by recommending the kit Real Techniques Eyeryday Eye Essentials (adlink) with brushes for eye makeup. And Real Techniques Flawless Base Set (adlink) for basic makeup. Then you have good brushes all the steps I show in this post :)

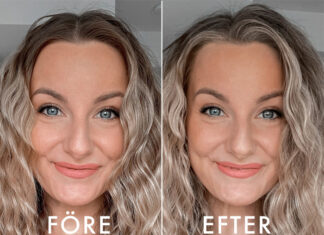
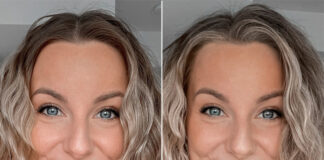
Here you see the result of mineral foundation on one half of the face.
A really good mineral foundation is suitable for all skin types, if you are dry in the skin, it is only extra important that you moisturize the skin properly before. Priming with a face primer before becomes the finishing touch as well.
Why is mineral foundation so good?
- It is quick to apply
- You choose the coverage rate yourself. Thin all over the face, full coverage all over the face, or full coverage only in certain areas by dabbing on extra just there.
- It is possible to skip both concealer and powder because the foundation can be obtained completely, and gives a matte finish that does not need to be fixed with powder = 1 step instead of 3.
- If it is not very sunny outside, you can also skip sunscreen, as mineral foundation naturally has SPF in it (unless you apply too thin).
Here's how I do it:

Dab / buff the mineral foundation on the skin with a soft but fairly compact brush. If it is too fluffy, you will not get as much pigment. I apply thinly all over my face, then I dab a little extra around my nose where I am a little red-flamed.
The mineral foundation is glo Skin Beauty Pressed Base Foundation (adlink) and I have the shade Golden Medium. It is a pressed powder which makes the whole thing even smoother compared to mineral foundation in loose powder form.

2. I dab with a small brush (does not matter which) on pimples. Then I avoid concealer.
Bonus tips! Har du en blemma eller liknande som är svår att täcka, dutta på lite brun ögonskugga eller ögonbrynspenna och gör den till ett födelsemärke/skönhetsfläck istället. Lite diskret räcker, inte nödvändigtvis mouche á la Marilyn Monroe. Det går snabbare och även får basen att se mer “osminkad” ut :)
Read my post Make-up freckles step by step where I use the same principle / technology.
2. Rouge in a neutral tone:

Here I have put blush on one half, but not the other. Makes a big difference but is both easy and fast done.
I usually love to do contouring with 1-2 dark shadows, a matte light, a shimmery light and then blush on it. In other words, a whole bunch of products, neither easy nor time efficient. No make-up tip for beginners if you say so;)
Instead, you can choose a blush in a more neutral tone, which you can put mostly on the cheeks but also a little in the rest of the face as well. It results in more color and shape on the face (you can otherwise look a little flat with only opaque products) but thanks to the blush being a neutral tone, you do not look reddish either.
What is a neutral tone? It depends a bit on what skin tone you have .. For me, a mild blush works that goes with hot apricot / peach. So not bronzer-brown but not strong pink either. Choose a color that is a little darker and a little more colored than your own skin tone, without being greasy.
Here's how I do it:

Sweep with a soft brush from the apple cheek and up to the top of the ear. Not too high up on the cheek. Here you can add a little extra color!
A good blush I can really recommend is Indy Beauty Make Me Blush! (adlink) in the shade Jasmine. It is a good beginner blush because it is well pigmented (so you do not need much) and becomes very even on the skin = you do not have to work so much with the brush but can just swipe on. The shade Jasmine is a very nice mild color that is not at all bright.

2. Wrap a thinner / more discreet layer up against the temple, preferably a little on the sides of the chin as well.
In other words, prime the skin the way your skin type / condition needs (skin care and face primer). Then just swipe on mineral foundation and blush, and the whole base is ready!
3. Simple eyebrow pencil:

There are eyebrow pencils that make it difficult to fill in the eyebrows and then there are pencils that make it very easy!
Highlighting the eyebrows raises the gaze and frames the face, which makes a big difference even if you make a very natural eyebrow.
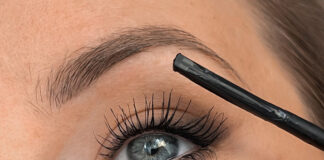
A brow pencil with a triangular tip makes it easy to fill in the brows naturally, because you work with a wide edge instead of a pointed tip.
The fountain pen I use, Pixi Natural Brow Duo (adlink) also has a brow at the other end which highlights the brows extra! Partly thanks to the fact that the strands lie down well-combed and nice, but also because it gives a glossy effect, which emphasizes your hair strands.
In short, these are the reasons why this pen is a good make-up tip for beginners:
- Easy to work with
- Gives a natural result
- Highlights your brow hairs too = more effect with a simple step
Here's how I do it:

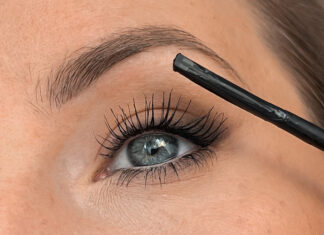
1. Fill in the brow with the pen. I usually first fill in the lower part of the brow and then work with small light strokes in the same direction as the straws grow.
In the post Pixi Natural Brow Duo Video + Instructions I show and explain everything about this in a video!

2. Apply bristle with the small brush at the other end of the pen.
När den kom in som nyhet på salongen så började både kunderna och våra makeupartister referera till den som “mirakelpennan” för att den är så enkel att använda. Kan vara produkten vi säljer mest av på salongen!
4. Do not skip eye primer!

Many people think that eye primer is an unnecessary or advanced step. How much difference does an eye primer make? Huge difference!
Why do you need an eyeshadow primer even as a beginner?
- Easier and faster application
- The eye shadow becomes more pigment-rich
- Make eye makeup more durable (both eye shadow, eyeliner and mascara)
Without primer, many people have problems with the eye shadow falling under the eyes, settling unevenly on the eyelid and if you use two colors, they just dust together with each other instead of being a nice transition.
And if you get a nice make-up without primer, it often ends up with the eye shadow lying like two lines on the eyelid when you blink for a few hours. And it's not fun!
In addition, the mascara can last better if you use eye primer. Many people have quite oily eyelids, this is due to the fact that the skin produces sebum / sebum. The oil dissolves mascara and eyeliner (also waterproof mascaras, because waterproof is not oilproof), which causes the mascara to discolor under the eyebrows during the day. But with primer, you keep the oil in check!
Here's how I do it:

Apply the primer on the entire eyelid. Not too stingy, but not thick all the way up to the brow either. Just right :) And then dab the cream evenly over the eyelid and up towards the brow bone.
Here I have used Pixi Eye Bright Primer, but it has now been discontinued. Another favorite is NYX Eye Shadow Base High Definition (adlink) that I have used for many years!
5. The same eye shadow around the whole eye:

Click here to see this make-up step by step.
Most make-up that you see step by step is done with eye shadows in 3 colors. Light, medium and then dark at the outer edge. It is really pretty! But it can be made even easier.
If you want a quick and easy make-up, it actually works just as well just to choose just one color and put it around the whole eye. Whether it is discreet, dark, colorful or glittery.
A brand that has really good single eye shadows that are great all alone around the eye, it's IsaDora! IsaDora Holiday Single Power Eyeshadow (adlink) finns i många användbara nyanser som är lätt att känna sig bekväm i samtidigt som de ger “det lilla extra” :)
Here's how I do it:

Use a soft brush (preferably rounded) and dab on the entire eyelid.
A rounded and compact brush is simpler than a flat one, because with a flat you get a sharp line that you need to tone out a lot. With a rounded edge, the edge becomes a little softer and is easier and faster to fade.

Använd en mindre borste under ögat, en lite rundad är enklast. Dutta under ögat och “bind ihop/möt” ögonskuggan på ovansidan i yttre ögonvrån. Svep lite med borsten fram och tillbaka om det behövs tonas ut extra.

Use a slightly larger and softer one (but not for fluffy) brush and fade out over the globe line. Swipe with the brush back and forth on the edge you want to fade out (sideways).
6. Brighten around the eyes:
By light I mean a few steps lighter than your own skin tone. Then whether it means a light off-white color or a lighter brown it depends on what skin tone you have :)

Dab light eye shadow in the corner of the eye and up a little on the eyelid.
As well as under the eyebrow. For example NYX Nude Matte Shadow (adlink) in the shade Have a headache

And the same eye shadow under the eye to lighten the shadow that most of us get there (more or less).
7. Light eyeliner along the waterline:

En ljus kajalpenna längs vattenlinjen gör enorm skillnad! Min är tatuerad, lyx! Det gör ögat och sminkningen lite “renare” då man får bort rödhet samt piggare då det öppnar upp blicken.
But here I use glo Skin beauty Precision Eye Pencil (adlink) in the shade Peach which is a light eyeliner in a perfect off-white / beige tone. If you have one that is too cold or too white, it can look a little unnatural to a neutral make-up.
8. Lighten up around the lips:

You can also apply a matte light eye shadow on the cupid's arch on the upper lip, to emphasize the lips extra. I do this with the same eye shadow as around the eyes.

And / or as I do every make-up - put the bright eyeliner around my lips too! It highlights the lip shape nicely without the need to apply makeup with a sharp edge with lip makeup.
Att ljusa upp under ögonen och kring läpparna såhär kan man tänka sig inte kvalar in som “sminktips för nybörjare” men rent tekniskt är det inte svårt alls. Det är framför allt enklare än att t.ex. applicera concealer under ögonen eller göra en skarp läppkontur med en läppenna :)
9. Black eye shadow instead of eyeliner:

Do you want to frame your gaze extra? A sharp carbon black eyeliner is considered by many to be difficult and time consuming, especially when it goes wrong. precision!
The eyeshadow Make Up Store Microshadow (adlink) in the shade Super Black is an eye shadow that works brilliantly for this!

I also recommend painting lashliner / fringe marking. That is, between the eyelashes. Read more about how to make lashliner in this post.
It is also tattooed on me, I am so spoiled;)
10. A good mascara that does not crumble or smudge:

Then apply mascara! No strangeness in this step. Two favorite mascaras that last well without crumbling or smudging are Sensai Mascara 38 ° (adlink) and Xlash Mascara (adlink).
Feel free to read my blog post Mascara Best in Test ⇔ (Review)
11. Colored lip balm:

A colored lip balm disappears in a discreet way because it is not comprehensive. This means that you do not have to think so much about the lips during the day because it never looks strange if you need to refill.
In addition, it does not require precision when applying, which means that this step in the make-up routine goes quickly. In addition, no mirror is needed if you improve on the go during the day!
Good complement when highlighting the lip contour with a light eyeliner before;) The lip balm I use is Pixi Shea Butter Lip Balm (adlink) and it's absolutely amazing! I use it no matter how much and always have one in my purse. This is the shade Natural Rose but it is available in more colors as well.

Clear!
12. The importance of good products:
I would also like to emphasize that the reason why this make-up is simple is partly due to the fact that it is made with simple techniques, but also with good products!
If you e.g. should apply eye shadow with a worn and perhaps too large makeup brush, and skip eyeshadow primer, well then it will be a struggle to get it nice.
Or if you are going to make a black eyeliner with an eyeshadow with a fluffy pigment that just turns greyish. Then it is difficult.
Or have a foundation that does not settle nicely at all or a brow pencil in the completely wrong color, then you will not be satisfied either.
But if you have found (or received help to find) the perfect make-up routine with good products and tools - then it will be both quick and easy and you will be just as happy every time! :)
And here is the end result of my 12 simple makeup tips for beginners:

Can you do anything more to get better at putting on make-up yourself? Yes! :) I have one makeup yourself course at the Helena Amiley Academy of Makeup. The level is beginner / intermediate and is aimed at all private individuals regardless of age, skin type and colors (eye colors, hair colors, undertones, skin tones, etc.).
You do not need any previous knowledge at all to take the make-up course as it mainly focuses on products, steps and make-up tips for beginners, but if you learn all the tips and steps, your make-up is far from beginner level.
Hope the post on makeup tips for beginners was inspiring and helpful!
Also read:
Hugs are ♥



 English
  Swedish
  Spanish
Hello
I wonder what you use for eye shadow / shade in this article?
Regards Jessica
Hello
I wonder what eye shadow and shade you use in this article?
Regards Jessica