

Contouring är någonting som jag typ inte kan leva utan i sminkväg, även om jag bara täcker några finnar i ansiktet så vill jag direkt lägga till lite contouring för att känna mig “hel” haha. Nu tänkte jag visa en contouring guide för er idag. En tutorial för nybörjare och för hela ansiktet med tydliga steg för steg beskrivningar! :)
And by contouring, I do not mean as it has looked in the US in recent years, where you first have lots of streaks all over your face and then become a completely different person after blending everything.
Contouring gör jag helst med en puder-palett och mjuka borstar för ett lite mer naturligt resultat som framhäver ansiktsdragen och tar bort den platta känslan i ansiktet som man får om man har en heltäckande bas i hela ansiktet. Och detta kallar man numera “non-touring” i USA haha. Non-touring är helt enkel ett mellanting mellan contouring (skulptera ansiktet mycket) och strobing (bara highlighter). Helt enkelt, det jag har kallat contouring hela tiden.
All these new fancy pancy words then… :)
You will find several different contouring products and palettes e.g. HERE (link)
Here's how I do contouring:

Here you see a contouring trio palette (link). These are often available in different shades, one a little lighter and one a little darker. I who have quite light skin still use it darker because I like when there is a lot of effect.

A quick overview before you read on and see my contouring tutorial:
Ljusa upp i ansiktets höga delar som man vill ska “poppa”. Mörka ner ansiktets djupa delar som man vill fördjupa ännu mer.
You can vary what you want to lighten up and darken down, everyone may not want more protruding nostrils or sharp cheekbones, you do exactly what you want :)

Alla skuggor i contouring paletten är matta, men den ljusa highlightern innehåller pytte, pyttelite lyster (inte så mycket som glow-highlighters) vilket gör att den blir väldigt naturlig på huden då den inte ger en “pudermatt” yta som många matta highlighters kan göra.
Make highlighter step by step:

- Light up under the eyes and down towards the nostrils. Conjures away darkness and cheers up. Many people who want to conjure away darkness under the eyes but do not really need a covering concealer can manage with only highlighter and can skip concealer completely.
- Light up under the brow and in the middle of the eyelid (skip the crease line). Makes the eyes brighter.
- Light up in the middle of the forehead…
- … And down along the bridge of the nose.
- Ljusa upp amorbågen, eller som jag brukar göra ljusa upp de två “ränderna” under mellan näsan och läppen, så ser läpparna mer fylliga ut.
- And in the middle of the chin, the chin looks more pointed.

7. Then I take a larger brush and lighten it up in the middle of the cheekbone to make them look sharper.
I have used Nanshy Blush Brush here, available to buy separately when we launch the new webshop on November 25, until further notice it is in the Nanshy Masterful Collection.
Contouring step by step:

- Darken down with an oblique brush under the cheekbone with the long side lying
- Turn the brush and fade out with the wide side.
- Darken down the temple and along the hairline
- Darken the sides of the chin
- Darken down under the jawbones (you can do on the jawbones too, then you get a rounder face, I like when the jawbones are more defined)
- Darken the sides of the nose, darken further in if you want the nose to look narrower.
- Darken down along the globe line also if you do not want eye shadows.
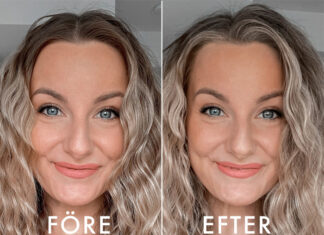
Contouring before and after:


Big difference but still natural!

The brushes are from Nanshy Masterful Collection and Nanshy Blending Brush. As soon as we open the new webshop on November 25, all brushes are available to buy individually.
Do you like the lipstick in the picture as well can be found here (link), do not remember exact brand & shade.
Shout out if you have questions about contouring or something else! ♥
Also read:
- Makeup brushes - (Choosing the right brushes for makeup)
- Make-up for beginners (Quick & Easy)
- 12 simple makeup tips for beginners (step by step)
- 10 tips when applying eye shadow




 English
  Swedish
  Spanish
Very nice! Love natural contouring !! And quite easy when you practice a little! So I will practice more according to this post to get even better. Have a nice weekend and hugs!
Oh how happy I am, fun to hear! :)